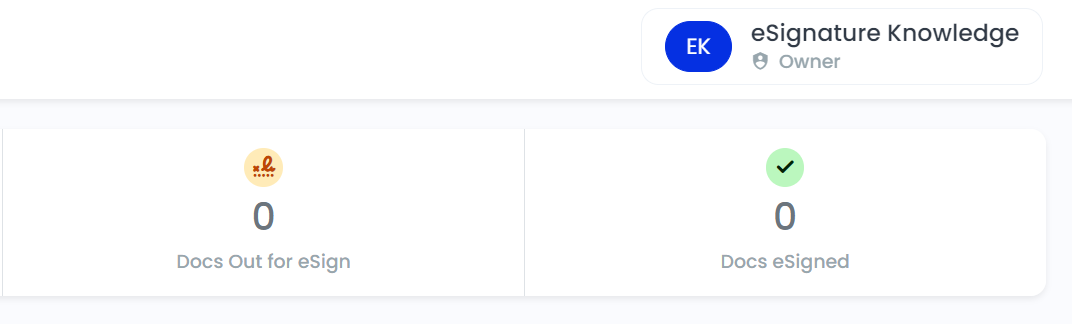
The eSignature functionality allows you to send documents generated in Smarter Drafter to your clients for digital signing. The documents are then signed in a secure and encrypted environment that only you and your clients have access to.
To use the eSignature function, you first need to enable eSignatures as an integration and then you can set specific preferences, branding and email settings for your eSignatures through the eSignature Portal.
eSignatures can be sent out through a variety of methods, which accommodate your workflow in Smarter Drafter, Microsoft Word or manually uploading documents.
Topics covered in this article:
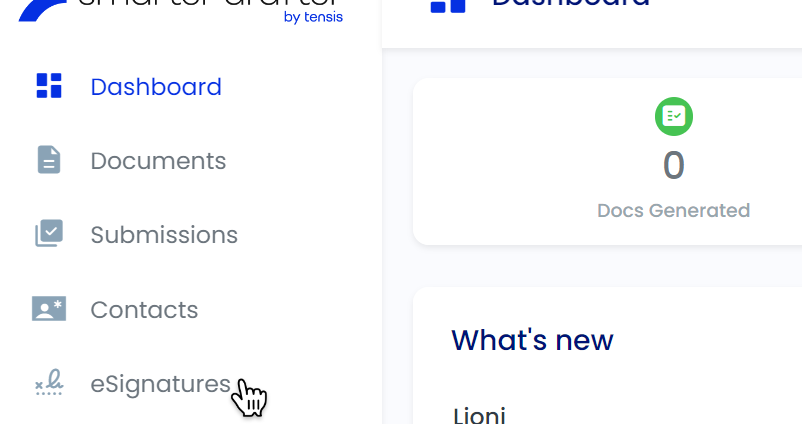
Enabling eSignatures
To enable eSignatures, you must be the Owner of your firm’s account. This is usually the person who signed up or who is managing the Smarter Drafter subscription. The setup only takes a few minutes and you only need to activate eSignatures for your account once.
If you’re setting up eSignatures after you have signed up, and you’re unsure if you’re the Owner, check the top-right corner of the Smarter Drafter Portal.
If you are not the Owner, please get in touch with your colleague who manages the Smarter Drafter subscription. If you’re the account Owner and you’re still having trouble, please get in touch with our team and we will assist you with setting up your eSignatures.
There are two methods to enable eSignatures feature for your account.
- You can activate eSignatures while signing up for a new account; or
- Through the Integrations Page in the Smarter Drafter Portal.
Note: You will only need to enable eSignatures for your account once.
Enabling eSignatures during Sign-Up
During the sign-up process, you will be asked if there are integrations you would like to enable. This will be the last step of the sign-up process.
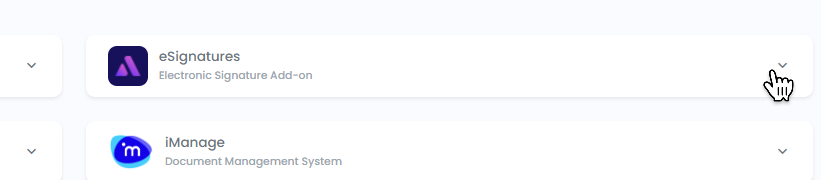
Click on eSignatures to show more information about the integration.
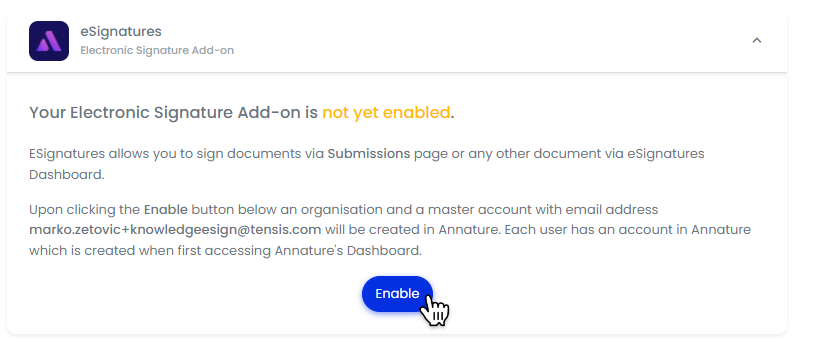
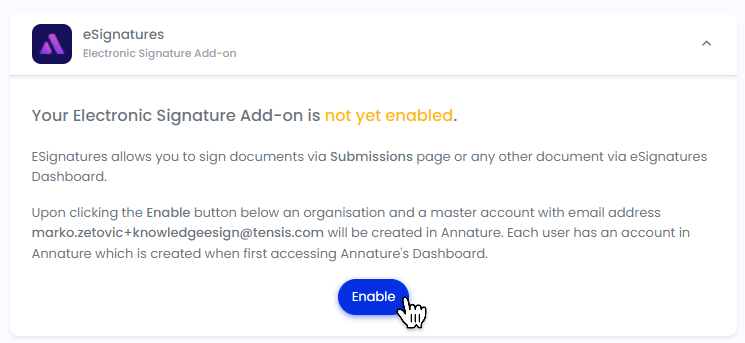
Click on Enable to activate eSignatures for your account.
Enabling eSignatures from the Smarter Drafter Portal
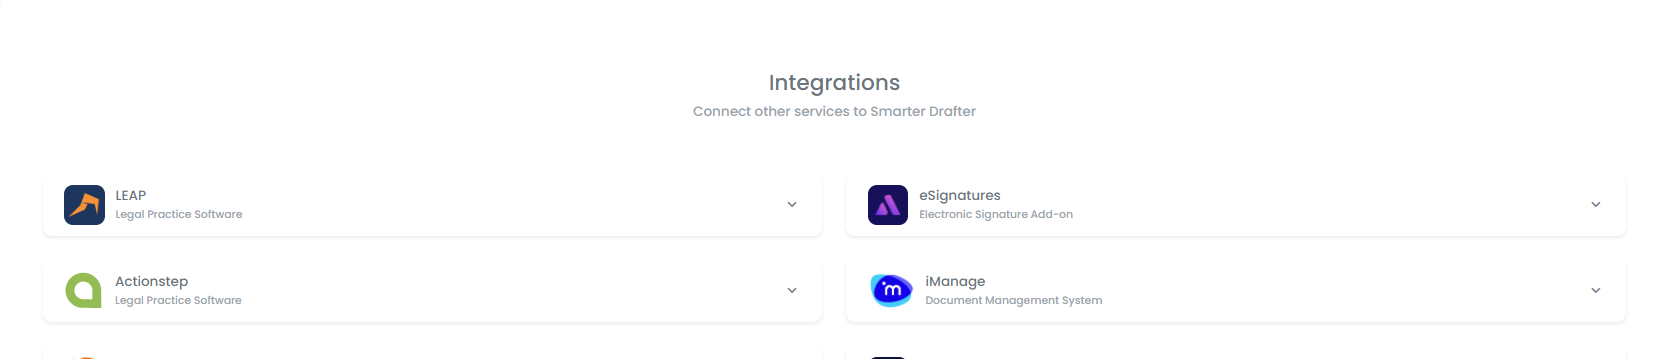
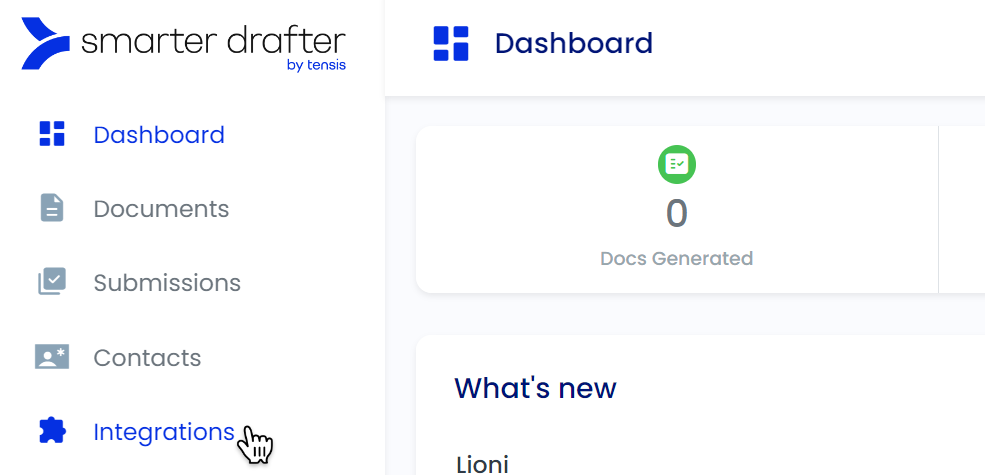
Navigate to the Integrations Page by clicking on Integrations in the side navigation.
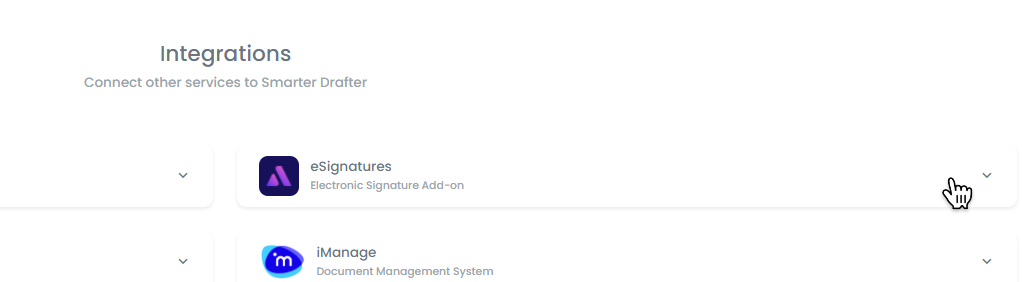
Click on eSignatures to show more information about the integration.
Click on Enable to activate eSignatures for your account.
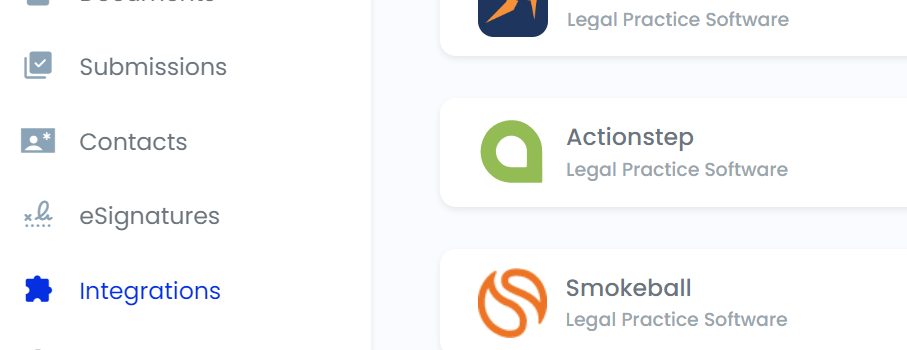
You should now see eSignatures appear above Integrations in the side navigation.
Sending eSignatures
Sending documents generated in Smarter Drafter for eSignatures is simple, and there are three ways to send documents for eSignatures.
- From the eSignature Portal
- From the Submissions Table; and
- From the Word Add-In
Sending from the eSignature Portal
There are two methods to access the eSignature Portal. These methods are only available after enabling eSignatures for your Smarter Drafter account.
Method 1: Click on eSignatures in the side navigation to open up the eSignature Portal.
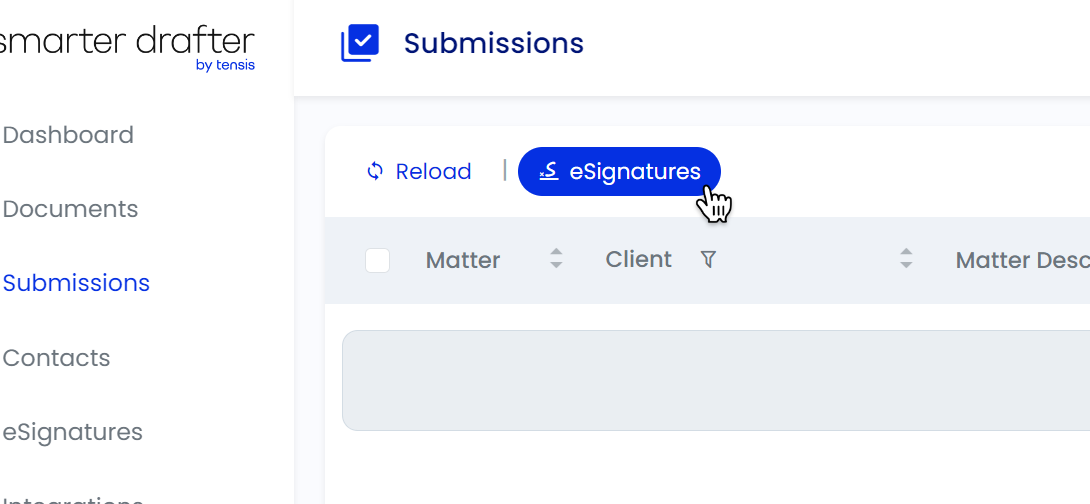
Method 2: Click on eSignatures above the Submissions Table to open up the eSignature Portal.
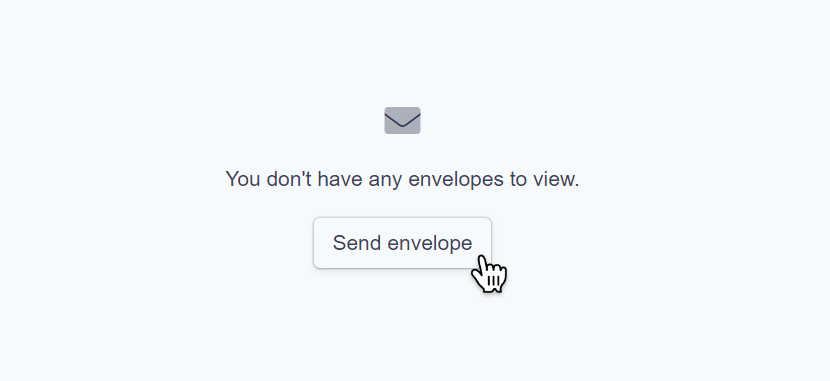
Click on Send Envelope to start a new eSignature.
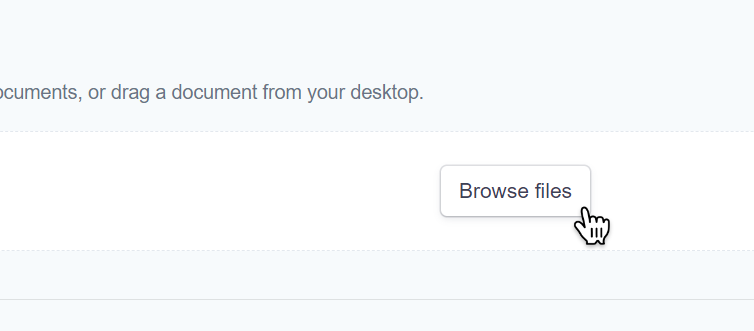
Click on Browse Files to upload the document that needs signing.
Add the recipient(s) who need to sign the document by filling out their details. Add extra recipients with the Add recipient button.
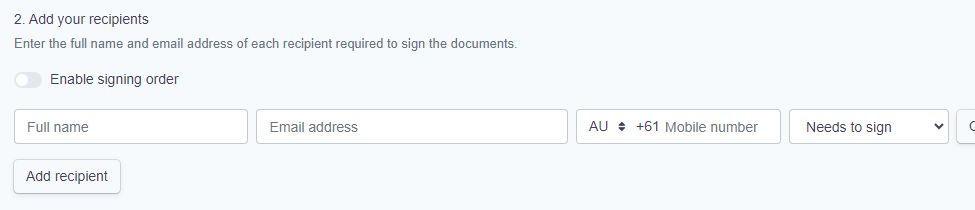
Note: Only the Full name and Email address are required. The Mobile number is not required to send the eSignature envelope successfully.
Optionally, enabling signing order will send the document in the order specified.
E.g. After the recipient with order number 1 signs the document, the recipient with order number 2 will receive the document to sign. This is mainly beneficial for documents that need to be signed in a specific order.
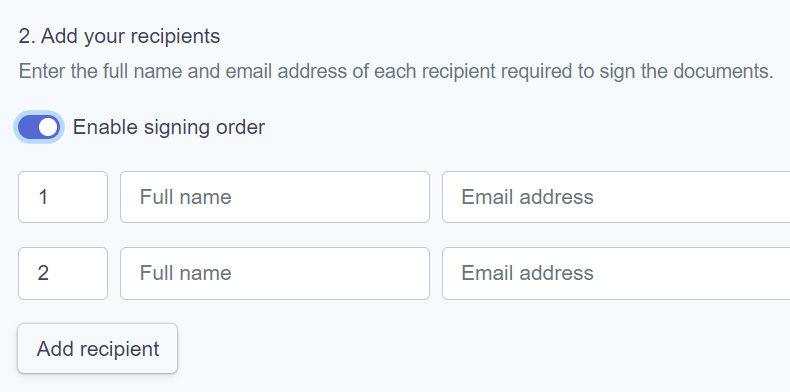
Note: If you need to remove a recipient, click on Options next to the recipient to remove, and click Remove recipient.
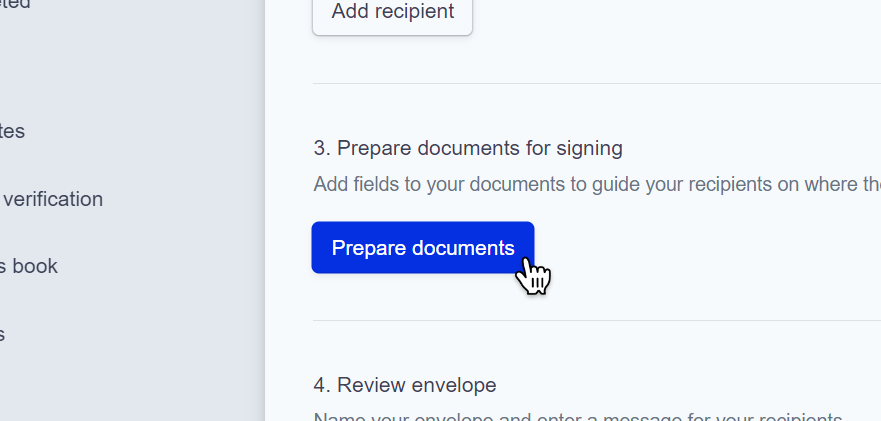
Once you are satisfied with the recipients and the signing order, click Prepare documents to implement the eSignature on the document.
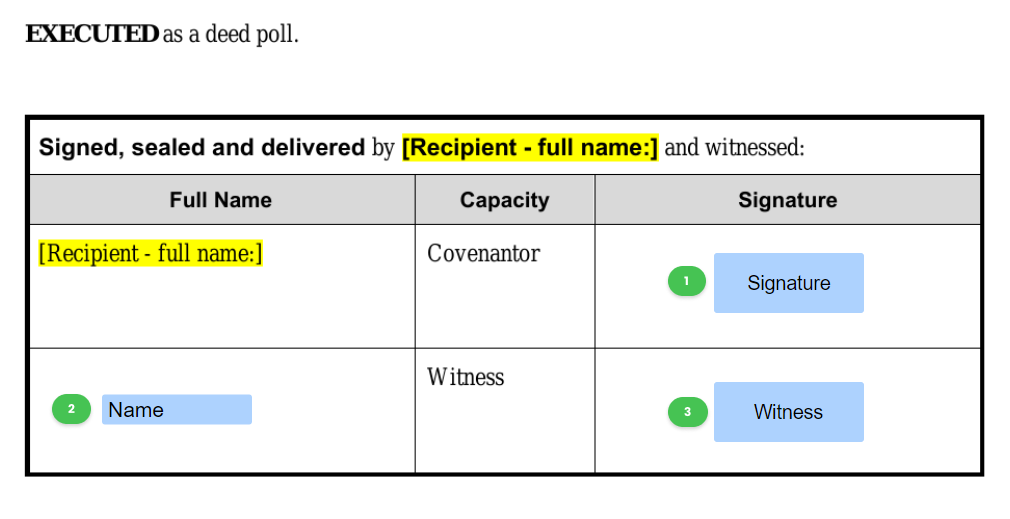
To prepare your document for eSignatures, use the Fields in the left-side navigation to indicate to the recipient where to enter details.
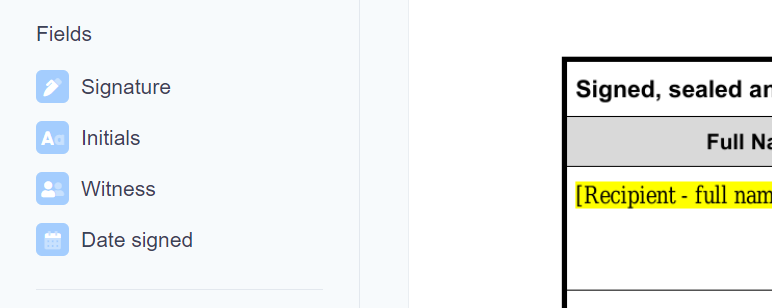
Drag and drop a field to the corresponding location in the document.
For example, in this document;
1. The Blue Signature box is where a recipient will sign the document.
2. The Blue Name box is where a witness can enter their name.
3. The Blue Witness box is where a witness will sign, and enter their name and email for a copy of the signed document.
Once you are satisfied with the prepared document, click Save changes in the top right.
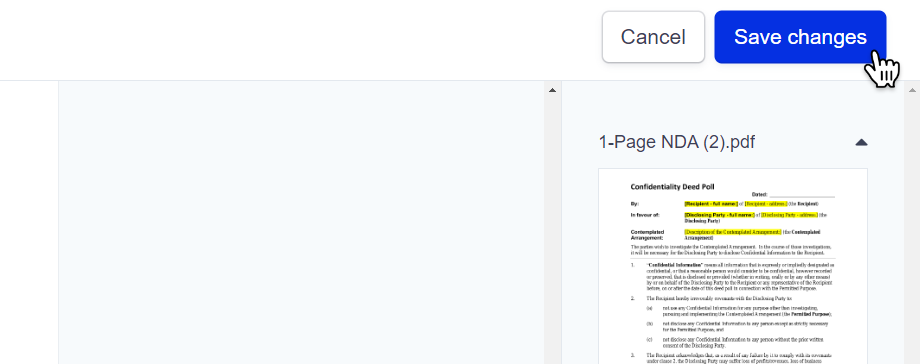
After preparing the document, you will be redirected back to the previous page.
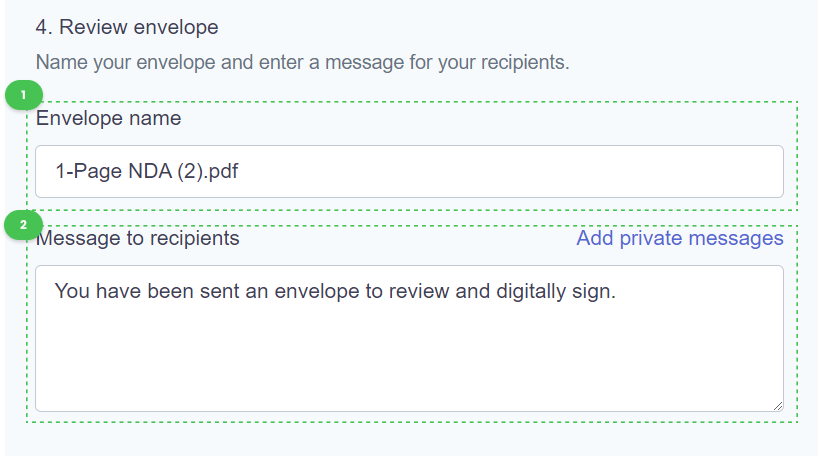
Take the time to review the eSignature envelope:
1. Check the name of the envelope - what the Email subject will contain and what the form will be referred to.
2. Check the message of the envelope - what the message, instruction, or body of the Email will be to the recipient.
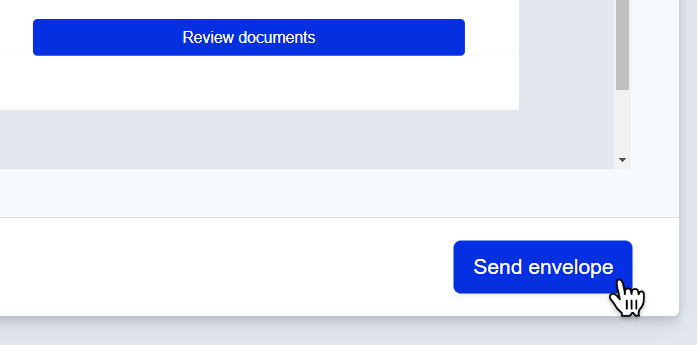
When you are satisfied with the prepared document, the envelope name and the envelope message, click Send envelope underneath the Email preview.
Learn more about sending eSignatures from the eSignature Portal.
Sending from the Submissions Table
Sending documents and submissions for eSignatures from the Submissions Table is only available after enabling eSignatures for your Smarter Drafter account.
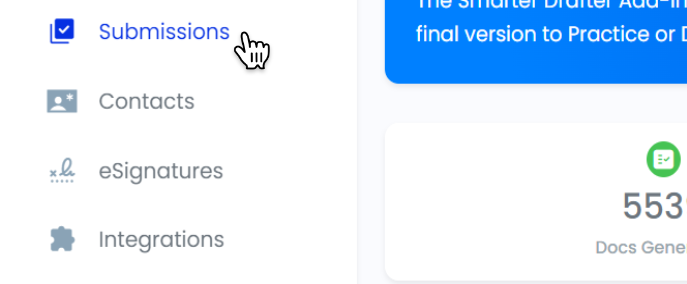
Click on Submissions in the side navigation to open the Submissions Table.
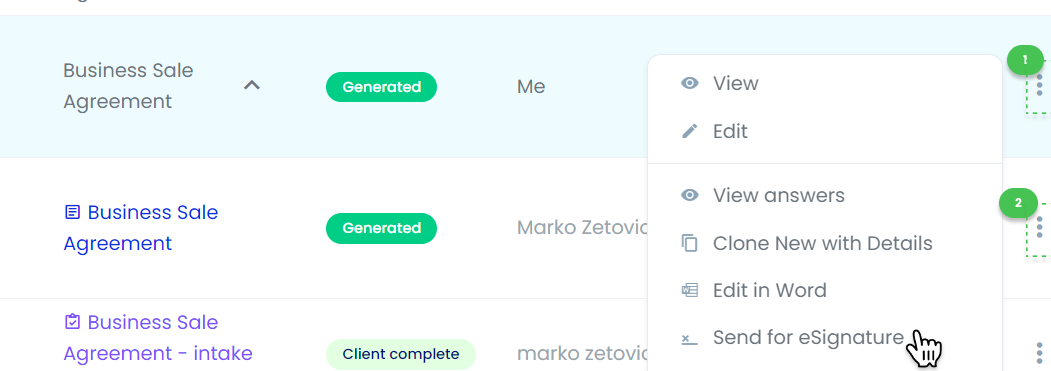
Find the Submission to send for eSignature. Click on:
- The Submission Ellipsis Menu; or
- The Document Ellipsis Menu
And then click on Send for eSignature in the menu.
Note: Both Ellipsis Menus contain the Send for eSignature option. However, if two documents in a submission can be eSigned, the Send for eSignature option will not appear in the Ellipsis menus.
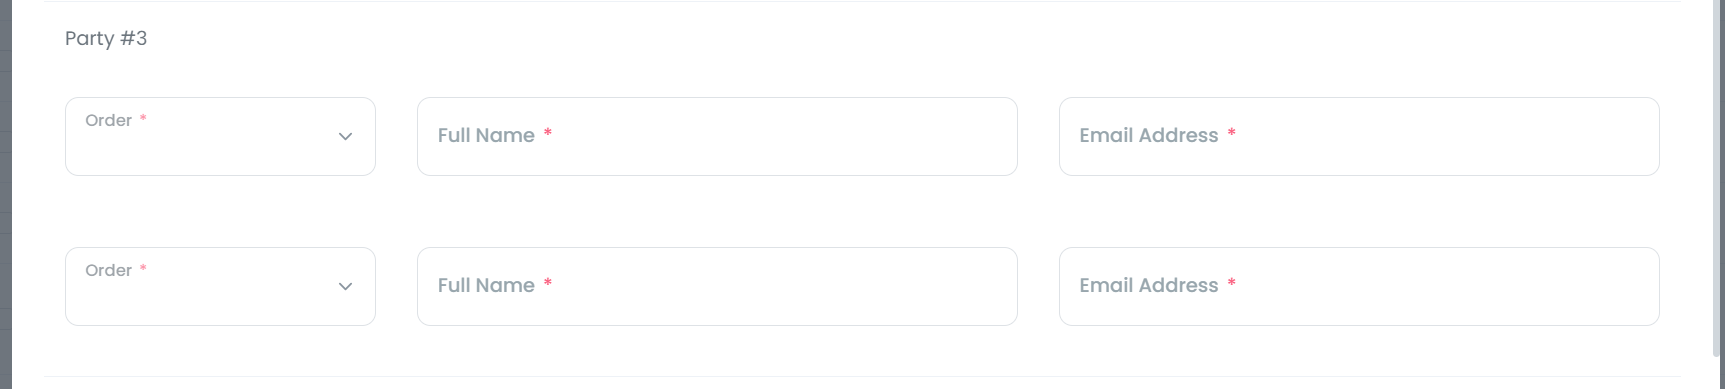
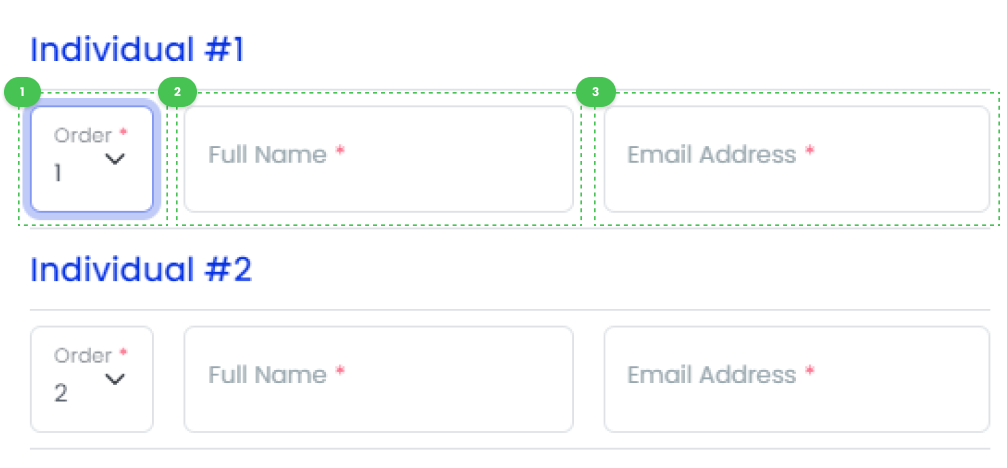
The Send for eSignature box will ask for the following fields for one eSignature:
- The Signing Order
- The Name of Signatory, where the signatory's Full Name is expected; and
- The Email Address to send the signatory's envelope to.

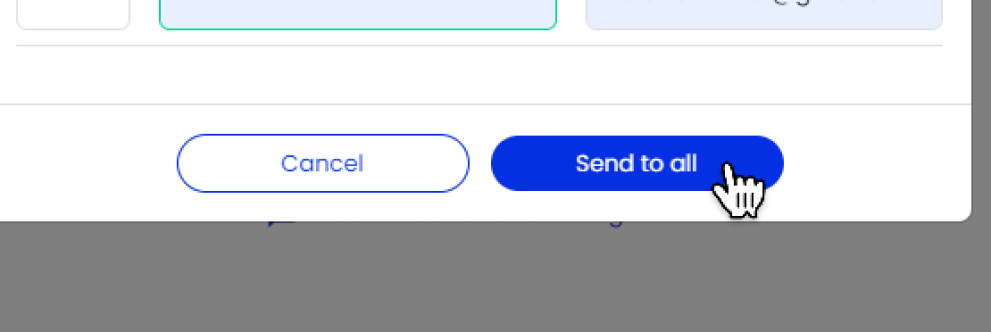
When multiple eSignatures are required, the fields are repeated. If there is a signing party required, the signing party eSignatures will be separated from individual eSignatures.
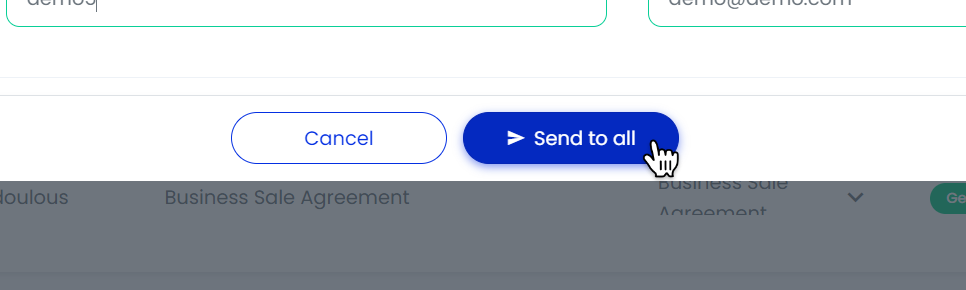
Once the required information is provided, click Send to all.
Sending from the Word Add-In
To send eSignatures from the Word Add-In, you must be logged in to the Word Add-In, have a Smarter Drafter document open in Microsoft Word and a submission open in the Word Add-In, and have enabled eSignatures.
Learn more about Editing in the Word Add-In and How the Word Add-In Works.
With a submission open, in the Word Add-In panel, observe the number of Signatories. These are the signatures expected.
Click Save & Send for eSignature.
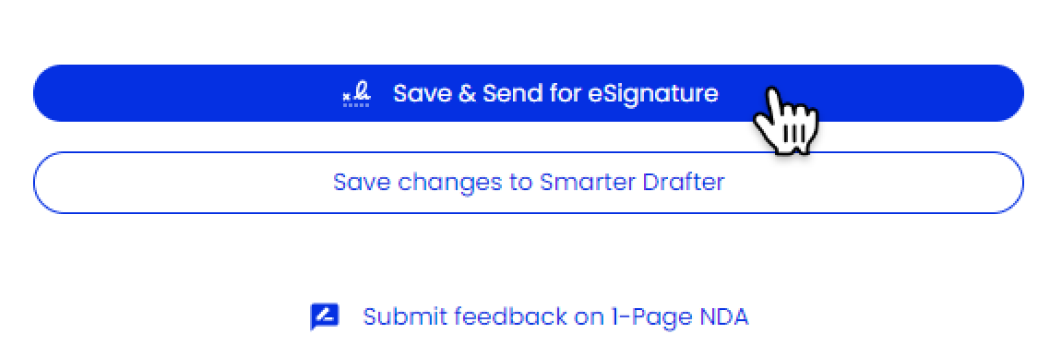
Note: Not all documents require an eSignature. The Save & Send for eSignature button will not appear for a submission that does not require an eSignature, or if you have not enabled eSignatures for your Smarter Drafter Account.
Each individual eSignature is shown by a number. The Send for eSignatures box will ask for the following fields for one eSignature:
- The Signing Order
- The Full Name of the signatory; and
- The Email Address to send the signatory's envelope to.
When multiple eSignatures are required, the fields are repeated with each individual's number. If there is a signing party required, the signing party eSignatures will be separated from individual eSignatures.

Once the required information is provided, click Send to all.
Using eSignatures
Once the envelope is out for eSignature, only the required parties are expected to sign the document in the signing order. The signature process can be done manually or with pre-generated signatures. The envelope will follow a flow which will eventually return to the law firm that issued the eSignature, attached with a certificate of authenticity.
eSignature Security
To enforce security and legitimacy in the eSignature process, the eSignature meets several requirements:
- The eSignature is limited to the sending method. For example, if only the email is entered for a signatory from the eSignature Portal, then the secure link to sign the document is only sent via email. If the phone number is entered too, the secure link will be sent via text message as well.
- Only the required parties will receive a secure link to sign the document, and only those parties and the law firm will receive the final signed copy of the document. Required parties includes signatories and witnesses.
- An option to manually sign the document electronically is presented, which allows the signee to either draw their signature or upload a picture of their signature, which would match their existing physical documents and identification.
- A certificate of authenticity generated on eSignature completion, with a recorded timestamp, location and electronic fingerprint.
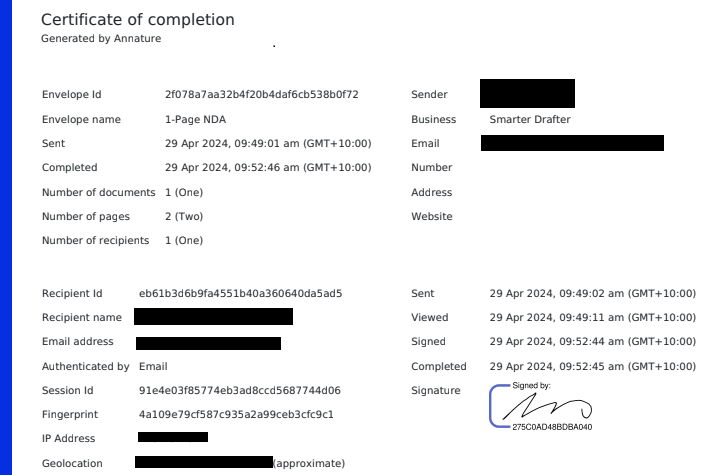
Note: The certificate of authenticity will be downloadable by the signees and the law firm, from the email sent for completing an eSignature, as part of the completed document.
How to sign an eSignature
Once a client has received a secure link to complete an eSignature envelope, the signature process is designed to be efficient for the client. Clients are given multiple options to assist them in completing the eSignature envelope.
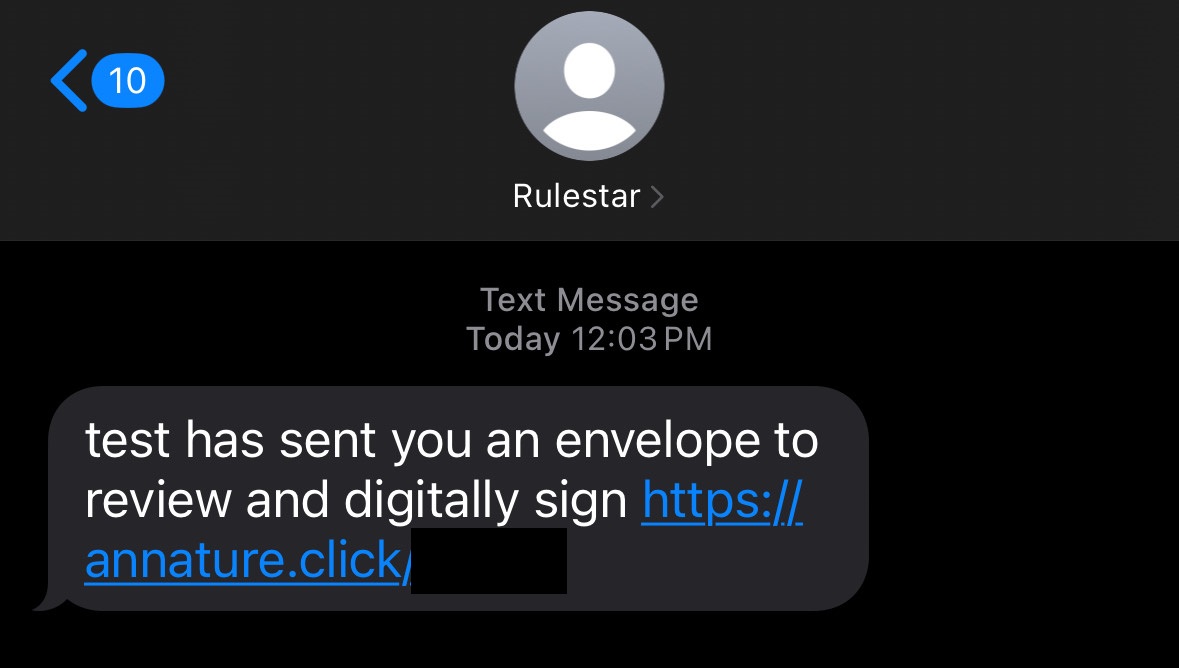
The secure link will be sent either through email or through a text message.
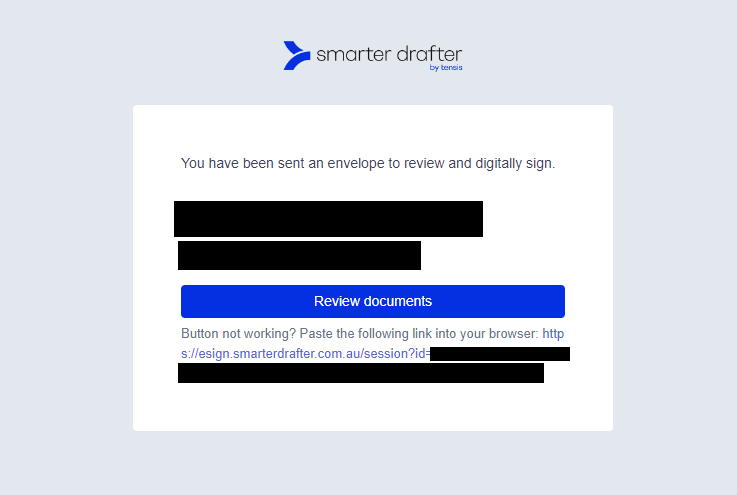
From the email, the "Review documents" button will direct the client via the secure link. The text message will contain a direct secure link.
Following the secure link will lead to the signature portal.
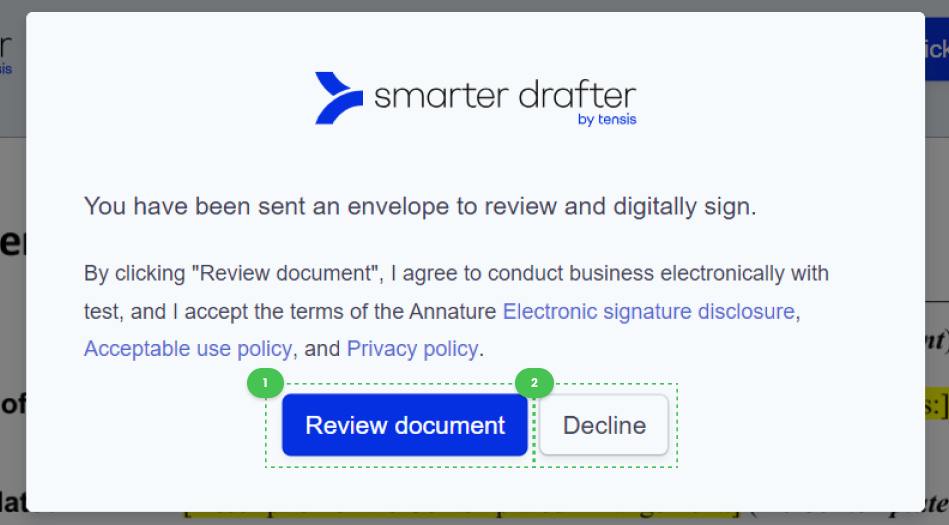
A prompt will appear when the document loads which will ask the user either to:
- Review document, where clicking this option confirms the recipient of the document and the client accepts the terms and conditions associated with the eSignature process. The client will then be given access to the document to review its contents and provide their signature.
- Decline the eSignature envelope, which prompts the client to enter a reason for declining, which will be sent back to the law firm with an email of eSignature envelope rejection.
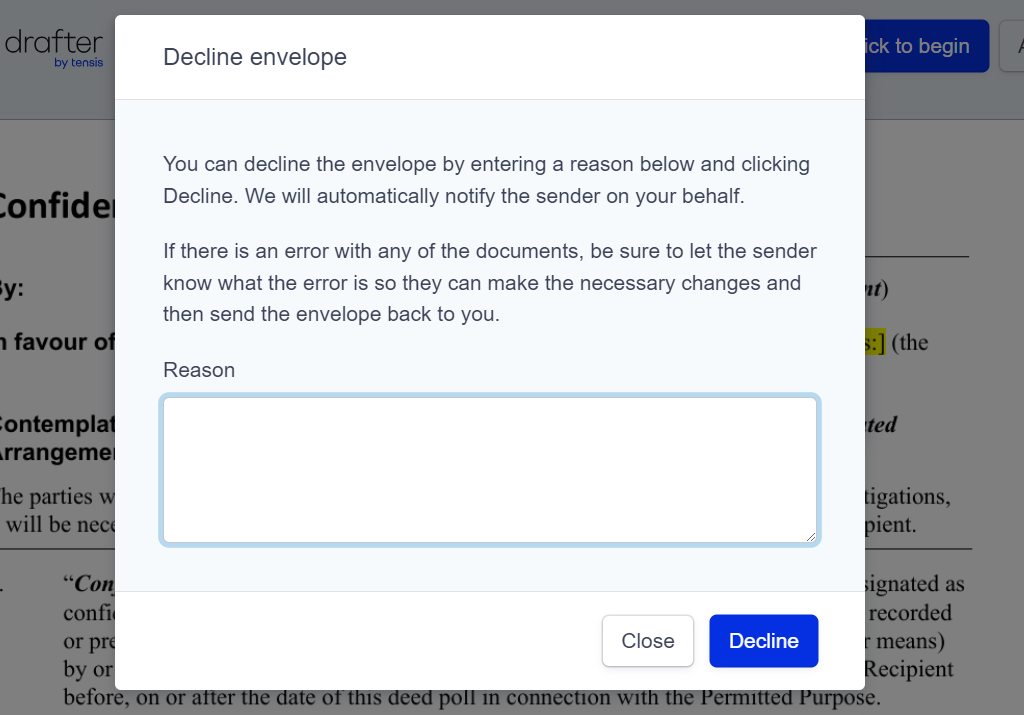
Clicking "Close" will close this prompt and return the user to the previous prompt.
Note: If the "Review documents" button is stuck loading, simply refresh the page. No data will be lost, and access to eSignature session will be intact.
After clicking Review document, the client is given freedom to navigate the document and is expected to review the document's content in full before signing the envelope.
After reviewing the document, at the top of the screen there will be options to guide the user:

- This image will reflect the law firm's logo if branding has been added.
- Click to begin will direct the client to the first instance of where their interaction is required.
- Actions will open a menu for envelope management.
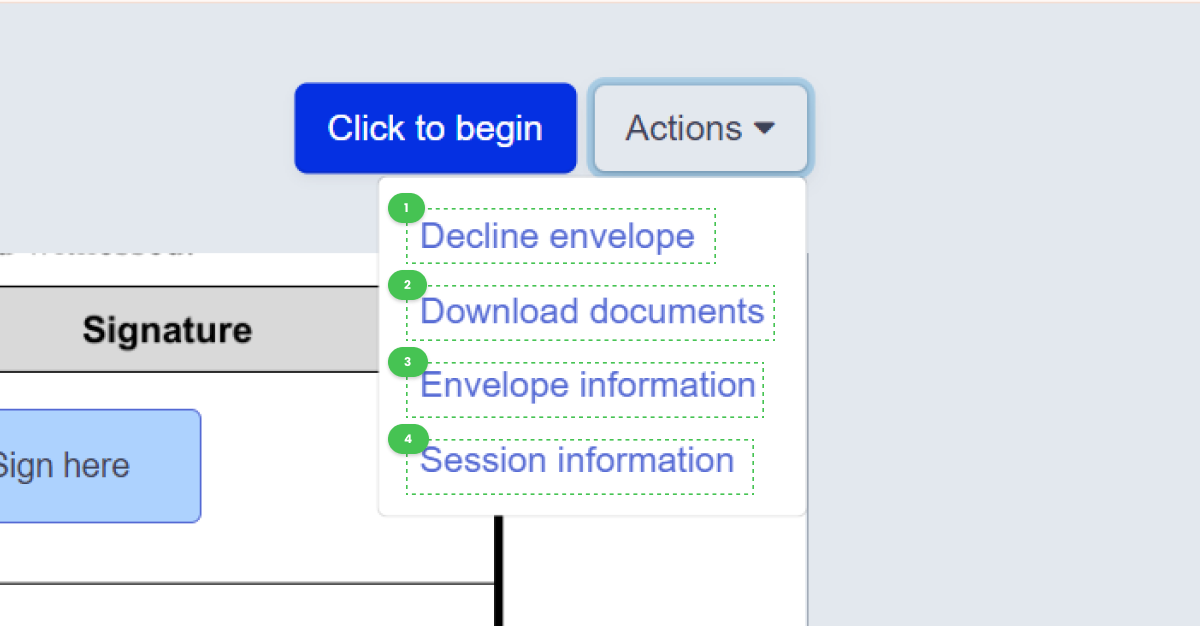
- Decline envelope prompts the client to enter a reason for declining, which will be sent back to the law firm with an email of eSignature envelope rejection.
- Download documents allows the client to download the document locally.
- Envelope information shows relevant information about the eSignature envelope, including document name, time sent, sender and law firm names, and the email address sent from.
- Session information will show information about the current eSignature session, which is essential for the certificate of authenticity.
When the client is ready to enter their signature, they need to click "Sign here" on the document.
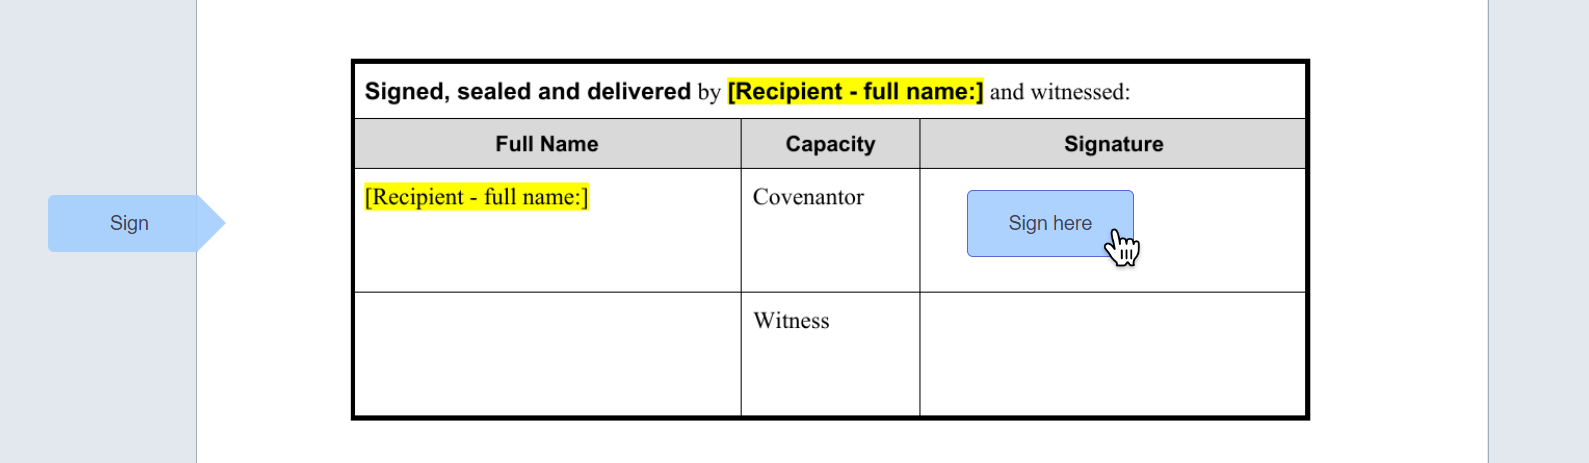
Note: While reviewing the document, required user interaction will be shown with arrows on the left-side of the document. For example, an arrow with "Sign" will be shown where the client is required to enter their signature.
In this example, the user can scroll to the "Sign" arrow and click "Sign here" without needing to click "Click to begin".
A prompt for the preferred eSignature method will appear.
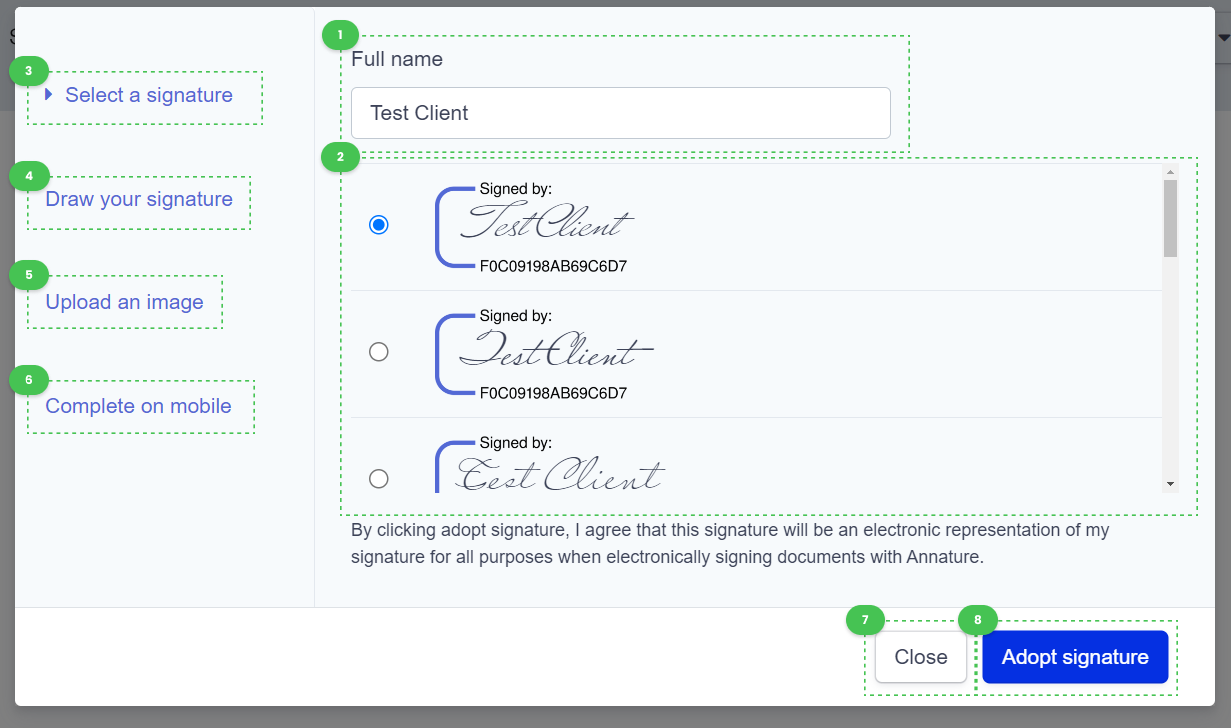
- The Full Name of the client, which can be changed. The changes will be reflected in automatically generated eSignatures.
- The relevant options and information for the signature method selected will be shown here.
- Select a signature allows the client to use an automatically generated signature, based on the Full name entered.
- Draw your signature allows the client to draw their signature using their device's peripherals, such as a mouse, touchpad or trackpad.
- Upload an image allows the client to upload a picture of their signature, such as the one on their driver's license or passport. We recommend a high-quality picture is used, where the signature is easily visible.
- Complete on mobile allows the client to generate a QR code to scan on their smartphone, where they are prompted draw their signature with their finger on their smartphone's screen.
- Close will close this prompt and return the client back to the document.
- Adopt signature will use the client's choice of signature from this prompt throughout the document in the locations their signature is required.
After adopting the signature and filling out the necessary details for the signee, the client's signature and details will be added to the document and the client will be directed to the top of the page to click "Finish signing".
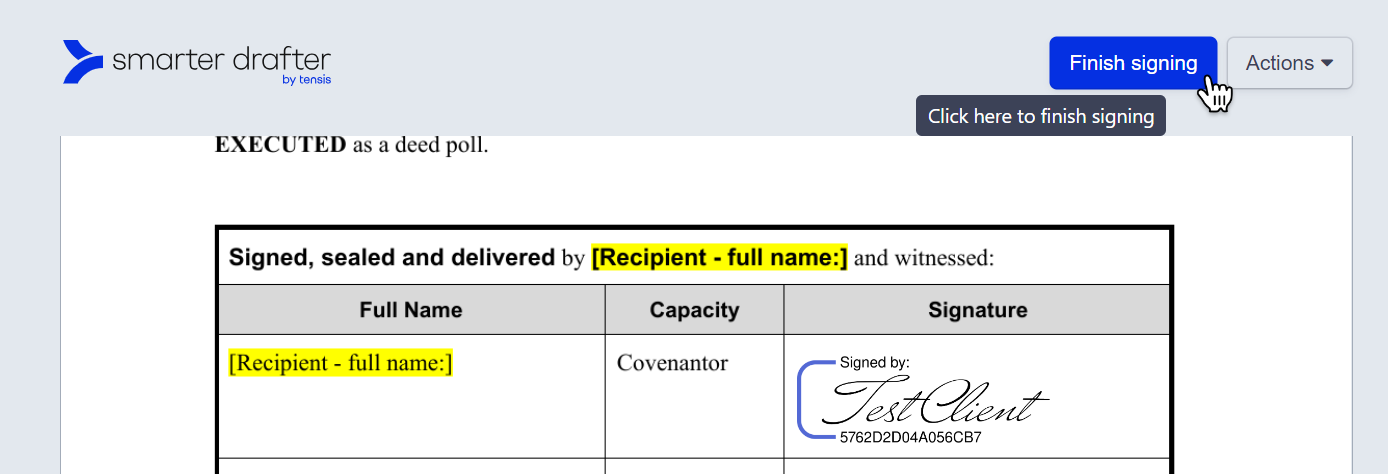
Clicking "Finish signing" will complete the signing process for the client.
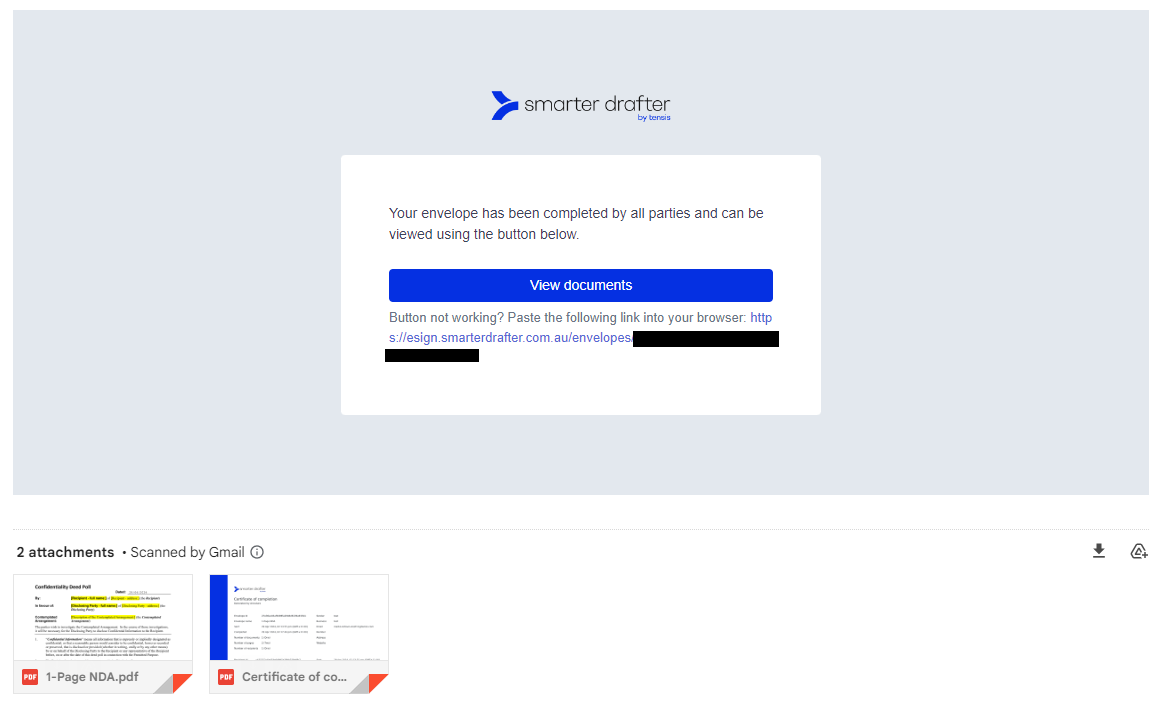
After the document has been completed by all the signing parties, the client, other signing parties and law firm will be emailed a copy of the completed signed document, a link to view the completed signed document online and a certificate of authenticity.
Learn more about how to sign an eSignature.
Downloading eSigned Documents
After the eSignature envelope is completed, the eSigned document will be available for download, along with the certificate of authenticity to verify the validity of the eSignature.
A copy of the signed envelope will be sent via email to the parties involved in the signing process, such as clients and witnesses, and a copy will be sent back to the law firm.
From the email, the completed envelope will be attached and will consist of the signed document and the certificate of authenticity. The envelope can be downloaded like a regular email attachment.

The completed eSigned document can also be downloaded from the Smarter Drafter Portal via the Submissions Table. However, the certificate of authenticity will not be included, to complete the full eSignature envelope.
To download the completed eSigned document from the Smarter Drafter Portal, navigate to the Submissions Table.
Click on the ellipsis menu for either the submission or document.
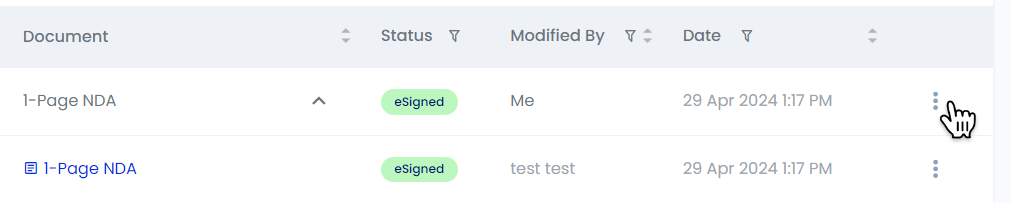
Note: The submission needs to have a Status of ![]() to be able to download the finished eSigned document.
to be able to download the finished eSigned document.
Click on either Download or Send for eSignature from the menu that appears.
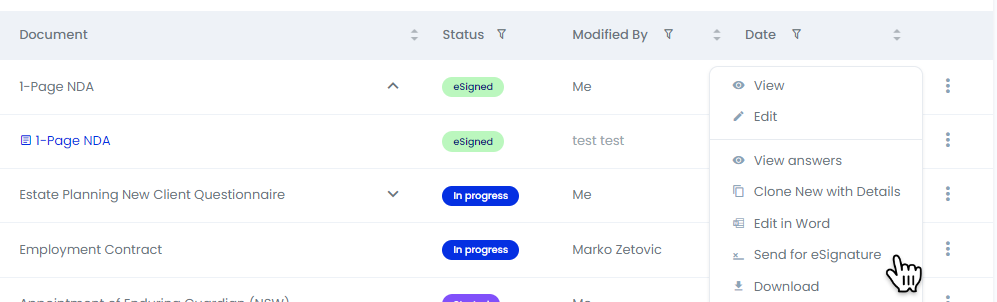
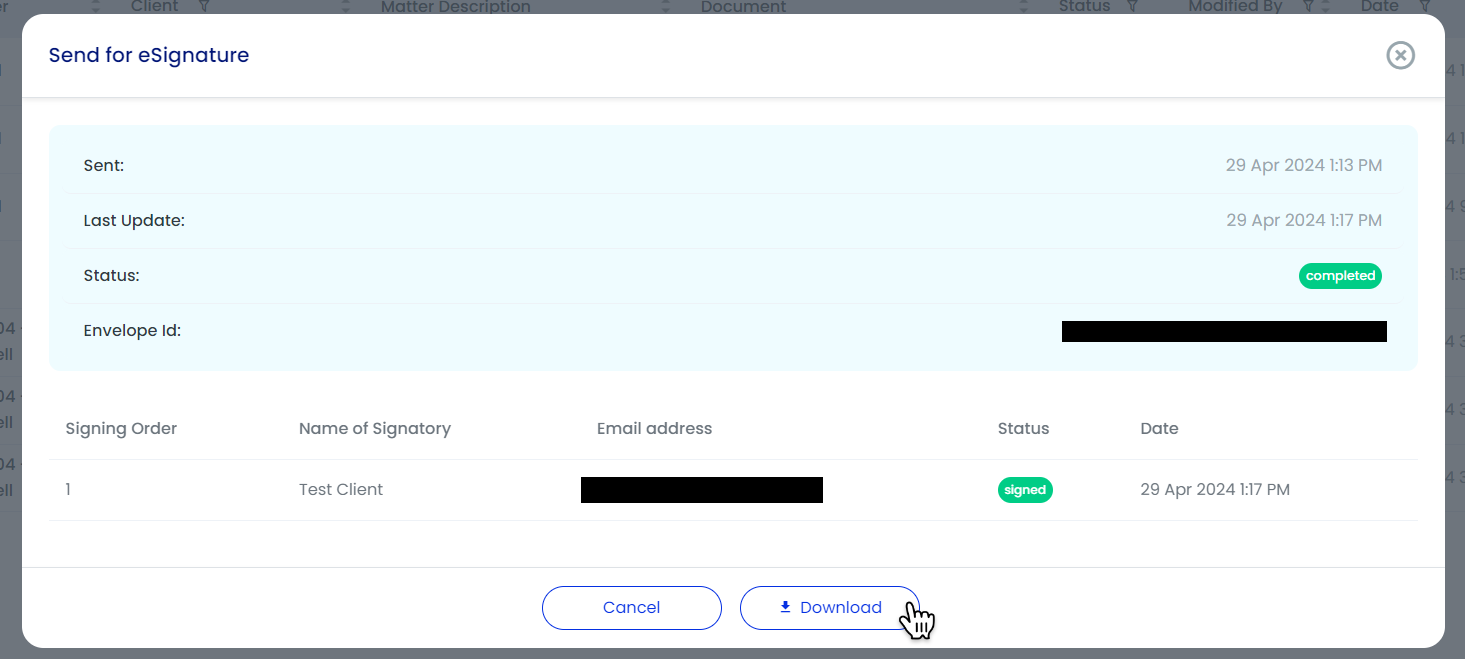
Send for eSignature: Clicking Send for eSignature will show the details of the completed eSignature envelope and a Download button to download a PDF file of the completed eSigned document.
Download: Clicking Download will show the download menu, where the completed eSigned document can be downloaded as a standalone PDF file or as part of ZIP file, complete with the document in .docx file format and the PDF file format.
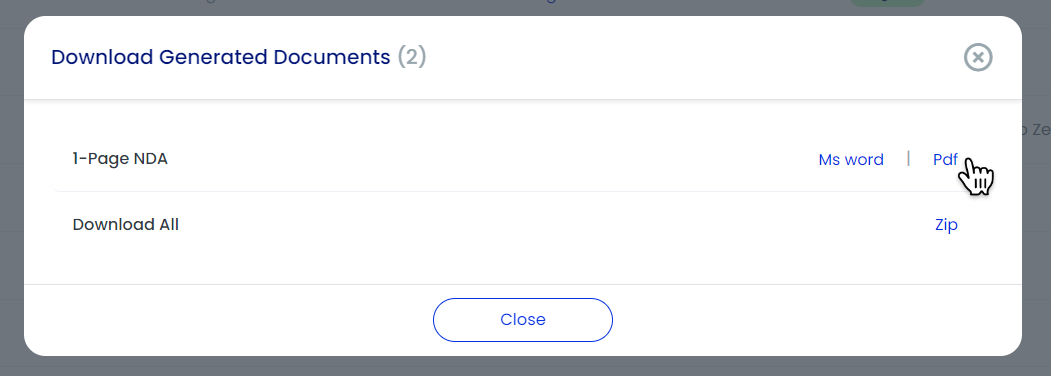
Note: The .docx version of the document downloaded from the download menu will not show eSignatures when opened in Microsoft Word (or other document editors). The eSignature will only show on the completed PDF file.
Sending to an integrated PMS or DMS will send the .docx file as well. It is recommended to download the PDF with the completed eSignature, and manually upload the file to a PMS or DMS as required for a Matter.
Learn more about downloading eSigned documents.
eSignature Portal
In addition to sending envelopes directly, the eSignature Portal allows for changing settings for the eSignature delivery process and envelope branding.
There are two methods to access the eSignature Portal. These methods are only available after enabling eSignatures for your Smarter Drafter account.
Method 1: Click on eSignatures in the side navigation to open up the eSignature Portal.
Method 2: Click on eSignatures above the Submissions Table to open up the eSignature Portal.
Either method will direct you to the eSignature Portal landing page.
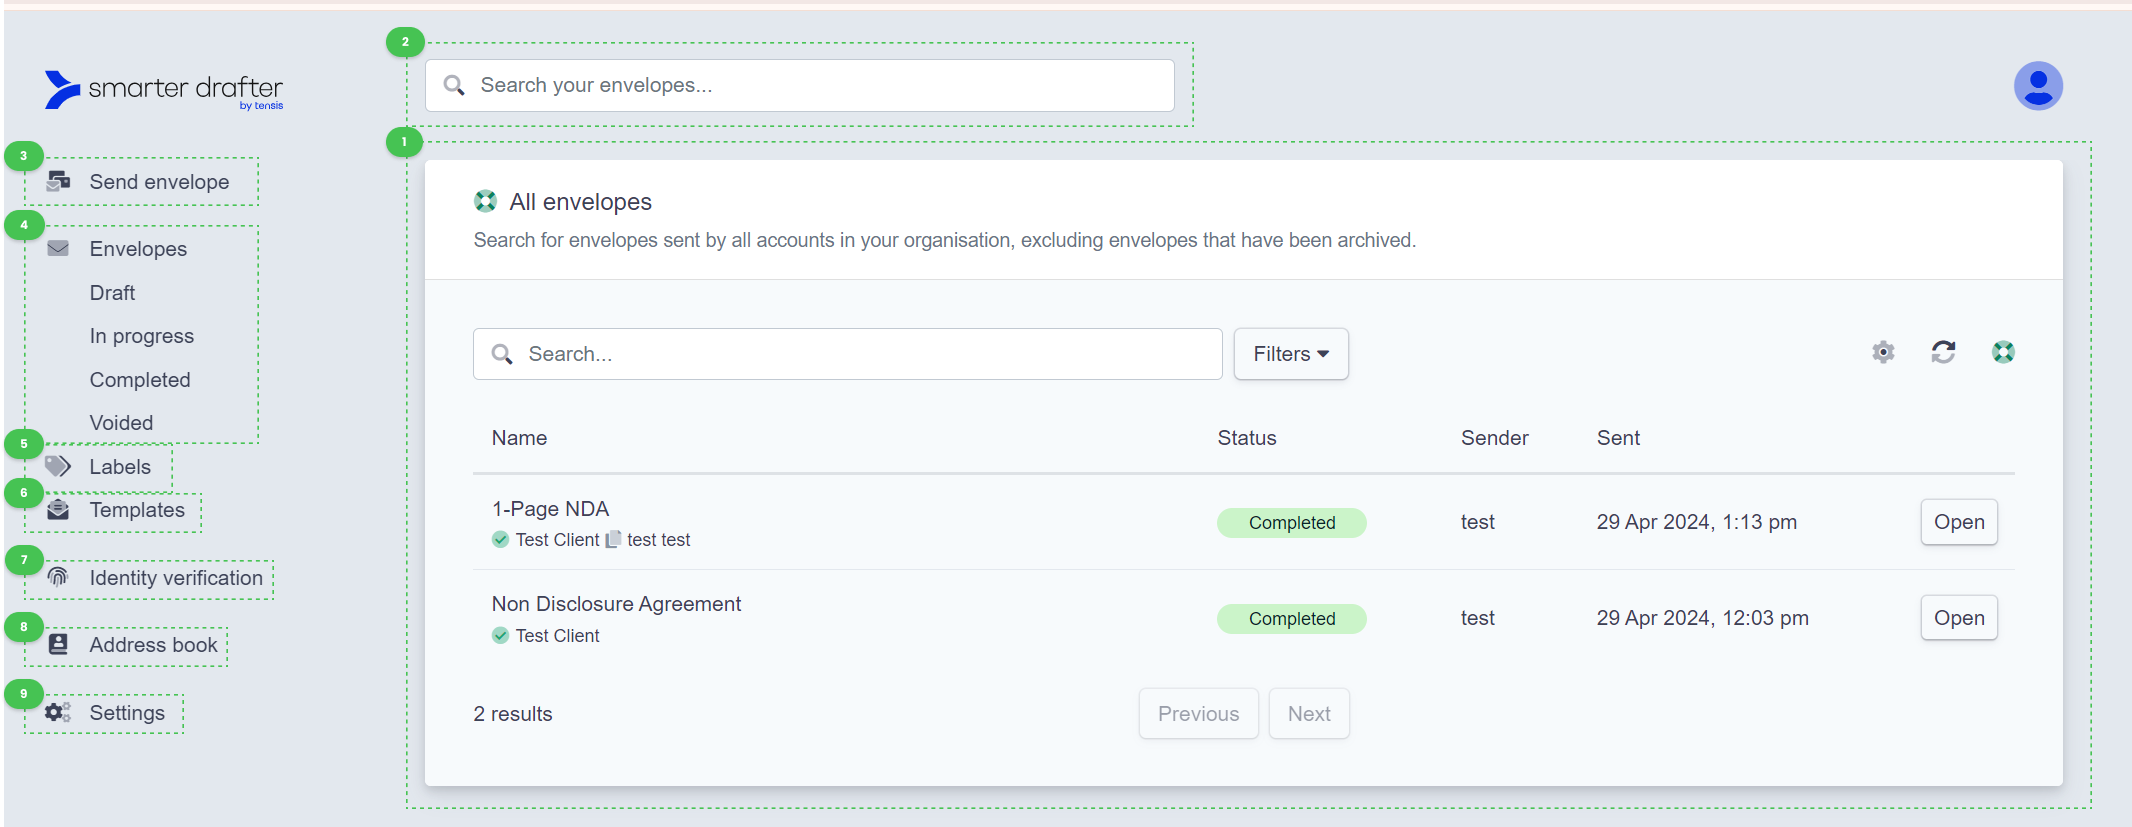
- Access to All envelopes will be shown, with the ability to search and filter through all envelopes. If envelopes have been sent previously, the most recently sent envelopes will appear for easy access.
- Search bar to Search all envelopes, which will redirect the user back to the All envelopes panel.
- Send envelope will start a new eSignature envelope. Learn more about sending eSignatures through the eSignature Portal.
- Navigation for all Envelopes on the account;
- Envelopes will direct the user to the All envelopes panel.
- Draft will show the envelopes that have not been completed but were saved as a draft.
- In progress will show the envelopes that have been sent out for eSignature.
- Labels will show envelopes grouped together by labels, which are created in settings. Learn more about creating labels.
- Templates will allow for the creation and management of envelope templates, which creates efficient and re-usable eSignature workflows from the eSignature Portal.
- Identity verification is an unused feature.
- Address book is where contacts that have received eSignature envelopes previously will be stored. This address book is separate from contacts in Smarter Drafter.
- Settings is where settings such as envelope branding, labels, and reminders can be set.
Accessing the eSignature Portal Settings will direct the user to the eSignature Settings Menu.
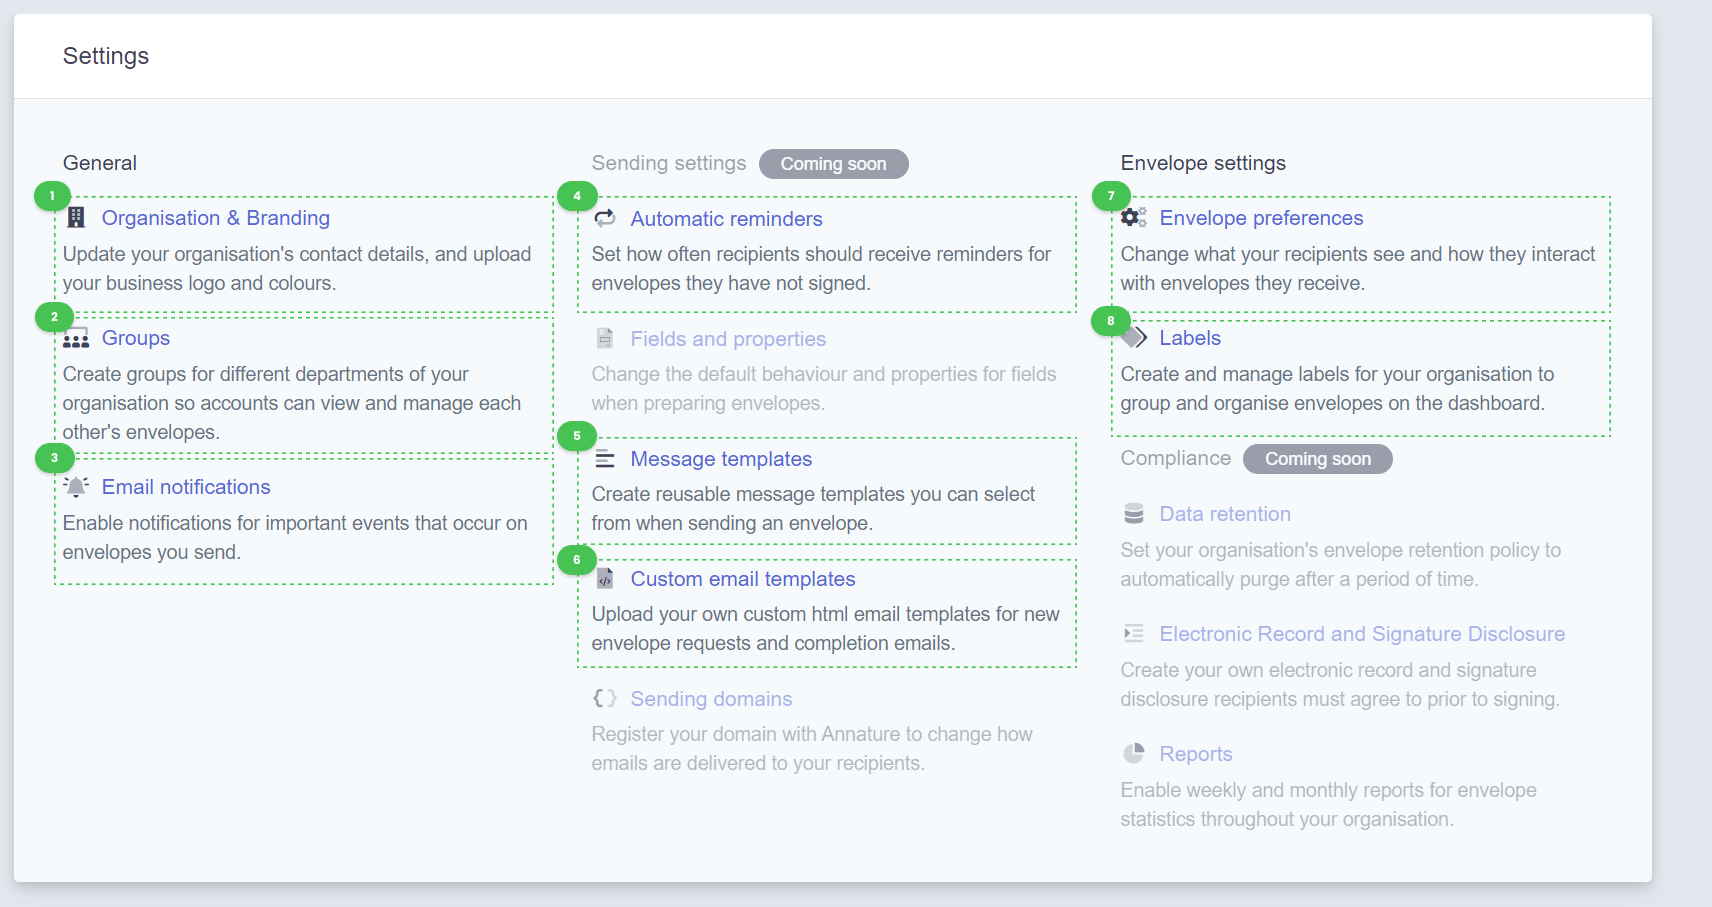
- Organisation & Branding allows users to enter information about their law firm, and change the branding and logo on their eSignature envelopes.
- Groups sets permissions within the law firm so that only the relevant members can view envelopes in the eSignature Portal.
- Email notifications allows preference customisation for email notifications for actions such as when a client views, rejects or signs an envelope.
- Automatic reminders will enable email reminders for client scenarios such as incomplete envelopes.
- Message templates allows for efficient and re-usable email templates for the envelopes. For example, a generic email body could be re-used and applied to a variety of a law firm's envelopes.
- Custom email templates allows for fully customised HTML email content when sending an envelope.
- Envelope preferences allows the restriction for data that may be sensitive, such as the certificate of authenticity containing redacted details.
- Labels allows for the creation of labels for envelope groups, which is used to organise envelopes. Learn more about creating labels.
Note: Branding can alternatively be applied through the Smarter Drafter Portal settings. The logo will be applied to eSignature headers.

Learn more about the eSignature Portal.